

A place for general chat about the Jimny. Please make sure you post in the correct section on the site, this way it keeps the site tidy AND ensures you get a more relevant answer.
Suppliers/Dealers or anyone selling with a commercial view in mind CANNOT post here unless responding to a specific request of a member in a "wanted" post.
Suppliers include people "breaking for spares" on a regular basis, when purchasing spares members should ask a supplier what they contribute to the running of the forum particularly if contacted by a Private Message
Suppliers or Members who have contributed to the forum can be identifed by the
 logo.
logo.
Suppliers/Dealers or anyone selling with a commercial view in mind CANNOT post here unless responding to a specific request of a member in a "wanted" post.
Suppliers include people "breaking for spares" on a regular basis, when purchasing spares members should ask a supplier what they contribute to the running of the forum particularly if contacted by a Private Message
Suppliers or Members who have contributed to the forum can be identifed by the
What did you do to your jimny today?
- supergaz
- New Member
-

Public
Less
More
- Thank you received: 0
23 Aug 2013 21:12 #80870
by supergaz
Blead it to death! Ripped its heart out! haha.
Replied by supergaz on topic What did you do to your jimny today
j999pre wrote: Still didn't clean it. Started on super gaz's m16a conversion
")
Blead it to death! Ripped its heart out! haha.
Please Log in or Create an account to join the conversation.
- GWR
- New Member
-
Public
Less
More
- Thank you received: 0
24 Aug 2013 08:44 #80887
by GWR
Sorry mate just noticed your question. I used to be a spray painter and have had to repair loads of bumpers in the past coz insurance companies hardly ever allow bumpers to be replaced! Most people will think they have a new bumper when they get there car back but it is likely it was repaired
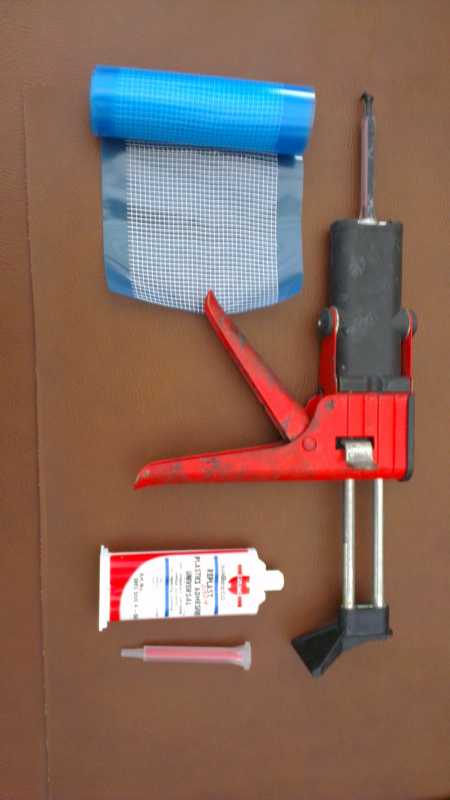
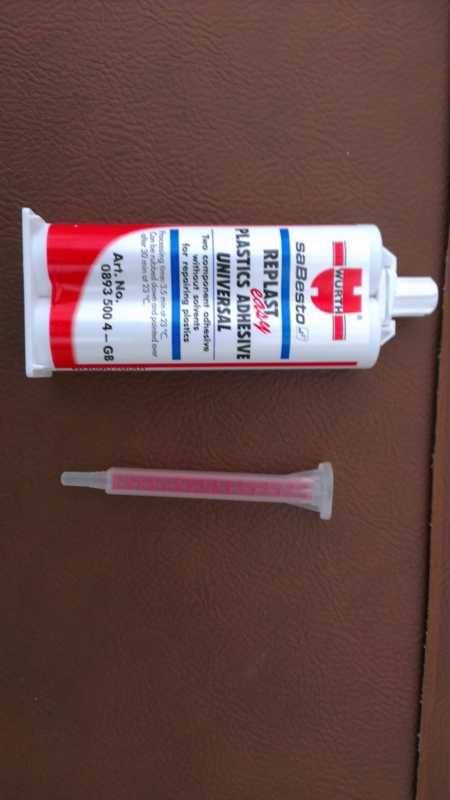
Anyway in answer to your question. First you will need the right materials. I use the Wurth Replast easy Plastic Adhesive universal and mesh. I will add photos in a bit. You need to key the area around the crack, about 3" either side with 80 grit paper. I would suggest you tape up the crack on the outside before applying any adhesive as it always seems to leak through . Cut some pieces of the mesh to cover the crack and overlap a couple of inches either side. Now apply the adhesive around the crack spread it around and place the mesh over the crack. Use a spreader edge to sink the mesh into the adhesive and if you want to add more adhesive to make it stronger you can. Work fairly quickly as it starts to go off quite quickly. Now leave it alone for a few hours to fully cure, DO NOT APPLY HEAT! :ohmy: It doesn't like it. Then I like to turn it over and use my dremmel to grind a v into the crack and fill it with the adhesive. Leave to cure sand it down and your ready to finish off with your normal filler and paint. That's all there is to it
 ")
Replied by GWR on topic What did you do to your jimny today
helijohn wrote:
How is that done?Repaired the large crack in the black part of my rear bumper ohmy:
Sorry mate just noticed your question. I used to be a spray painter and have had to repair loads of bumpers in the past coz insurance companies hardly ever allow bumpers to be replaced! Most people will think they have a new bumper when they get there car back but it is likely it was repaired
Anyway in answer to your question. First you will need the right materials. I use the Wurth Replast easy Plastic Adhesive universal and mesh. I will add photos in a bit. You need to key the area around the crack, about 3" either side with 80 grit paper. I would suggest you tape up the crack on the outside before applying any adhesive as it always seems to leak through
. Cut some pieces of the mesh to cover the crack and overlap a couple of inches either side. Now apply the adhesive around the crack spread it around and place the mesh over the crack. Use a spreader edge to sink the mesh into the adhesive and if you want to add more adhesive to make it stronger you can. Work fairly quickly as it starts to go off quite quickly. Now leave it alone for a few hours to fully cure, DO NOT APPLY HEAT! :ohmy: It doesn't like it. Then I like to turn it over and use my dremmel to grind a v into the crack and fill it with the adhesive. Leave to cure sand it down and your ready to finish off with your normal filler and paint. That's all there is to it Please Log in or Create an account to join the conversation.
- GWR
- New Member
-
Public
Less
More
- Thank you received: 0
24 Aug 2013 08:47 - 24 Aug 2013 08:59 #80888
by GWR
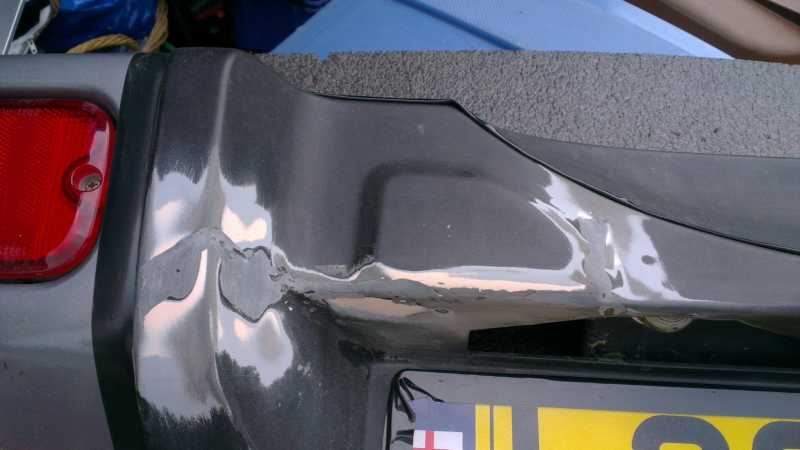
Sorry about the rubbish photo it's the only one I took. Ignore the normal filler you can see, this was the previous owners attempt to repair it.
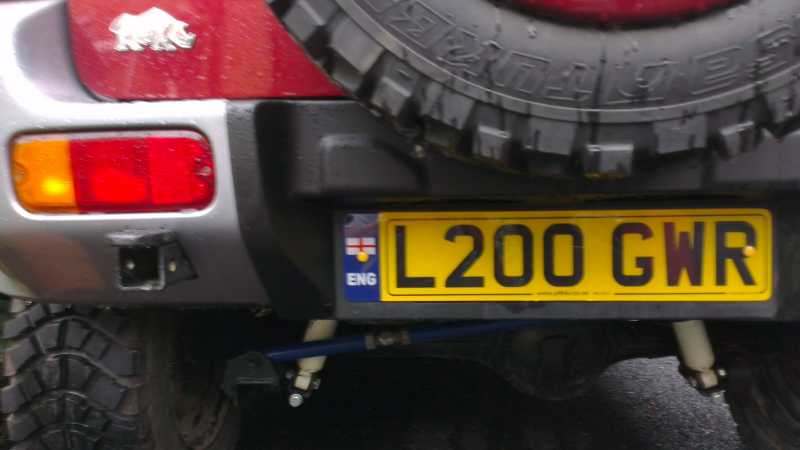
Here is a photo of the finished repair.
Replied by GWR on topic What did you do to your jimny today
GWR wrote:
helijohn wrote:
How is that done?Repaired the large crack in the black part of my rear bumper ohmy:
Sorry mate just noticed your question. I used to be a spray painter and have had to repair loads of bumpers in the past coz insurance companies hardly ever allow bumpers to be replaced! Most people will think they have a new bumper when they get there car back but it is likely it was repaired
Anyway in answer to your question. First you will need the right materials. I use the Wurth Replast easy Plastic Adhesive universal and mesh. I will add photos in a bit. You need to key the area around the crack, about 3" either side with 80 grit paper. I would suggest you tape up the crack on the outside before applying any adhesive as it always seems to leak through
Sorry about the rubbish photo it's the only one I took. Ignore the normal filler you can see, this was the previous owners attempt to repair it.
Here is a photo of the finished repair.
Last edit: 24 Aug 2013 08:59 by GWR.
Please Log in or Create an account to join the conversation.
- steffan
- New Member
-
Public
Less
More
- Thank you received: 0
24 Aug 2013 10:22 #80894
by steffan
Replied by steffan on topic What did you do to your jimny today
Smart job looks like newGWR wrote:
GWR wrote:
helijohn wrote:
How is that done?Repaired the large crack in the black part of my rear bumper ohmy:
Sorry mate just noticed your question. I used to be a spray painter and have had to repair loads of bumpers in the past coz insurance companies hardly ever allow bumpers to be replaced! Most people will think they have a new bumper when they get there car back but it is likely it was repaired
Anyway in answer to your question. First you will need the right materials. I use the Wurth Replast easy Plastic Adhesive universal and mesh. I will add photos in a bit. You need to key the area around the crack, about 3" either side with 80 grit paper. I would suggest you tape up the crack on the outside before applying any adhesive as it always seems to leak through
Sorry about the rubbish photo it's the only one I took. Ignore the normal filler you can see, this was the previous owners attempt to repair it.
Here is a photo of the finished repair.
Please Log in or Create an account to join the conversation.
- GWR
- New Member
-
Public
Less
More
- Thank you received: 0
24 Aug 2013 11:05 #80900
by GWR
Replied by GWR on topic What did you do to your jimny today
Here is a photo of the finished repair.
[/quote]
Smart job looks like new[/quote]
Cheers mate
Smart job looks like new[/quote]
Cheers mate
Please Log in or Create an account to join the conversation.
- helijohn
- New Member
-
Public
Less
More
- Thank you received: 0
24 Aug 2013 16:00 #80927
by helijohn
Replied by helijohn on topic What did you do to your jimny today
Thanks for showing me how it is done. It's interesting that insurance companies don't like replacing bumpers. I'm now going to look over my bumpers from the inside. lol
Please Log in or Create an account to join the conversation.
Time to create page: 0.414 seconds