

Are you building a Mud Monster or a Pavement Princess??
If so you can have your own thread in this section.
This section on other websites has led to arguments and contention. People are posting pictures of their pride and joy and therefore CONSTRUCTIVE comments only please!
If so you can have your own thread in this section.
This section on other websites has led to arguments and contention. People are posting pictures of their pride and joy and therefore CONSTRUCTIVE comments only please!
Dave's la(te)st buggy build...
Less
More
- Posts: 3727
- Thank you received: 923
28 Dec 2020 17:04 - 28 Dec 2020 17:08 #231267
by X8GGY
Replied by X8GGY on topic Dave's la(te)st buggy build...
A bit more today. as indicated above I only opened the shop for the morning, and spent the afternoon in the garage...
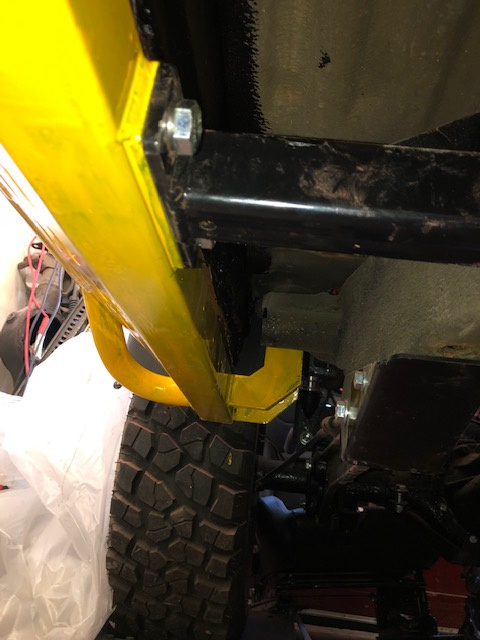
I started by giving the sidebars a third coat of Yella paint")
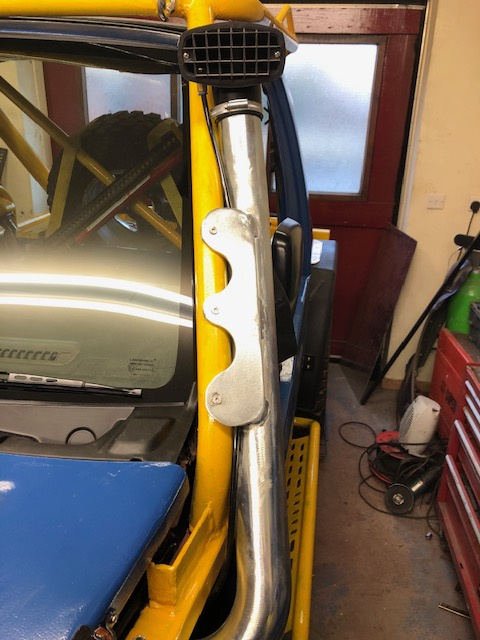
And then finished the snorkel off... if you look closely you'll just about see the black breather tube going up behind the snorkel mounting bracket...
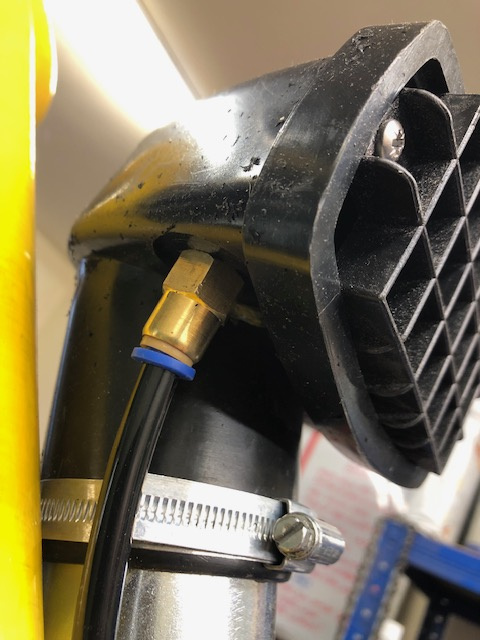
And it then disappears through the underside of the snorkel head into this brass fitting...
(You can also just about see that I had to take a wide 'chisel' woodworking drill bit to make a recess as the plastic was so thick!)
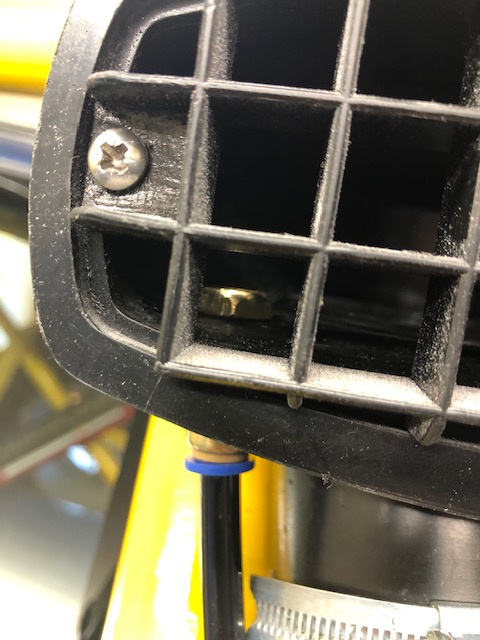
And then inside the snorkel head is a breather port for all the linked breathers (rear axle, front axle, gearbox, transfer box and the charcoal filter in the driver's side - as mentioned earlier)

This breather - that blue silicon hose goes into another nylon breather tube that joins all the others in the engine bay...
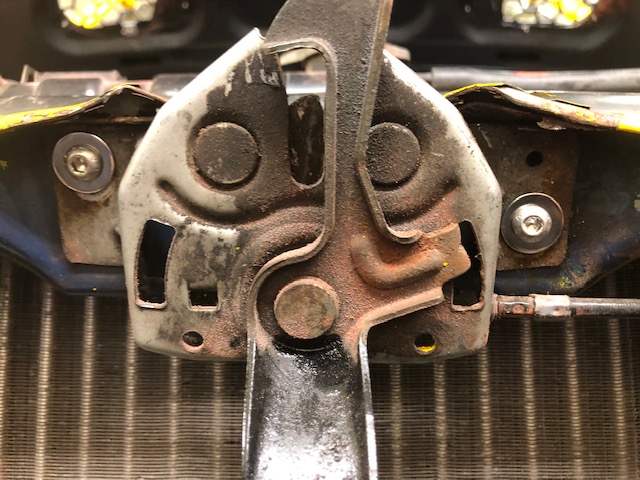
I then started fixing a little problem I'd noticed after finishing the "bent" box-section front wing tops... the bonnet wouldn't shut fully It would latch onto the safety notch before the bonnet is pushed down to fully close, but it wouldn't... the reworked bonnet hit the wing tops first So I took the latch off to slot the mounting holes BUT (of course!) one of the bolts snapped first :pinch: So I ended up drilling holes above the two existing bolt locations and putting riv-nuts into them... sorted! The bonnet shuts nicely now
 ")
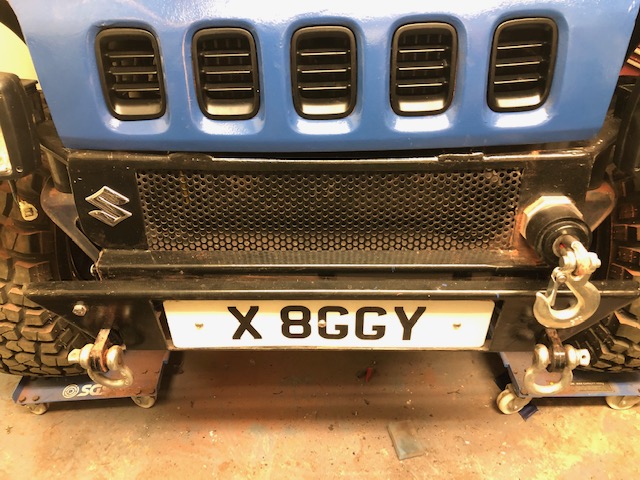
And to finish off the front... as I'd "de-badged" the middle bonnet grill insert, I put a small new Suzuki badge on the opposite side of the winch rope's donut fairlead to balance the front out
I started by giving the sidebars a third coat of Yella paint
And then finished the snorkel off... if you look closely you'll just about see the black breather tube going up behind the snorkel mounting bracket...
And it then disappears through the underside of the snorkel head into this brass fitting...
(You can also just about see that I had to take a wide 'chisel' woodworking drill bit to make a recess as the plastic was so thick!)
And then inside the snorkel head is a breather port for all the linked breathers (rear axle, front axle, gearbox, transfer box and the charcoal filter in the driver's side - as mentioned earlier)
This breather - that blue silicon hose goes into another nylon breather tube that joins all the others in the engine bay...
I then started fixing a little problem I'd noticed after finishing the "bent" box-section front wing tops... the bonnet wouldn't shut fully
It would latch onto the safety notch before the bonnet is pushed down to fully close, but it wouldn't... the reworked bonnet hit the wing tops first So I took the latch off to slot the mounting holes BUT (of course!) one of the bolts snapped first :pinch: So I ended up drilling holes above the two existing bolt locations and putting riv-nuts into them... sorted! The bonnet shuts nicely now And to finish off the front... as I'd "de-badged" the middle bonnet grill insert, I put a small new Suzuki badge on the opposite side of the winch rope's donut fairlead to balance the front out
Last edit: 28 Dec 2020 17:08 by X8GGY.
The following user(s) said Thank You: Riccy
Please Log in or Create an account to join the conversation.
Less
More
- Posts: 3727
- Thank you received: 923
30 Dec 2020 16:55 - 30 Dec 2020 17:04 #231336
by X8GGY
Replied by X8GGY on topic Dave's la(te)st buggy build...
A bit more today...
This made me laugh... as I was putting my boots on to go out to the garage, the Labradors thought they were getting a walk so sat on the stairs waiting for me... alas it was persisting it down... Sorry guys!

That's Buddy at the bottom of the stairs and Milo at the top... although we should have called in Gromit! :woohoo:
Anyway...
I started by reattaching the newly painted (three coats of JCB Yellow) JimnyBits sidebars...
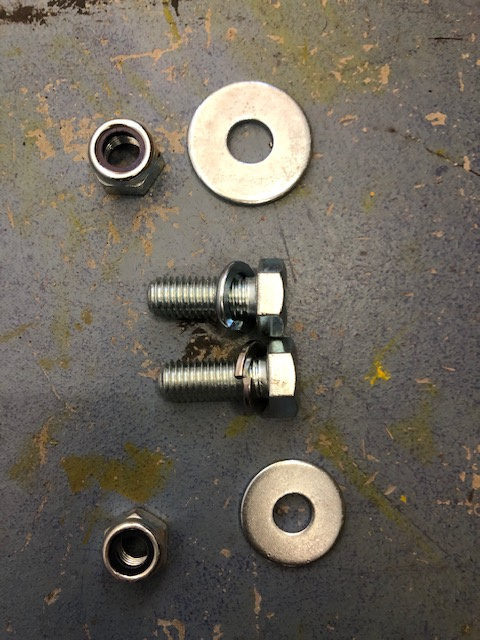
New fastenings all round... metric fine 12mm and 10mm nuts with oversize washers for the bodymounts either side under the (half) doors, and some new M12s to bolt the sidebars to the chassis brackets, with spring washers...
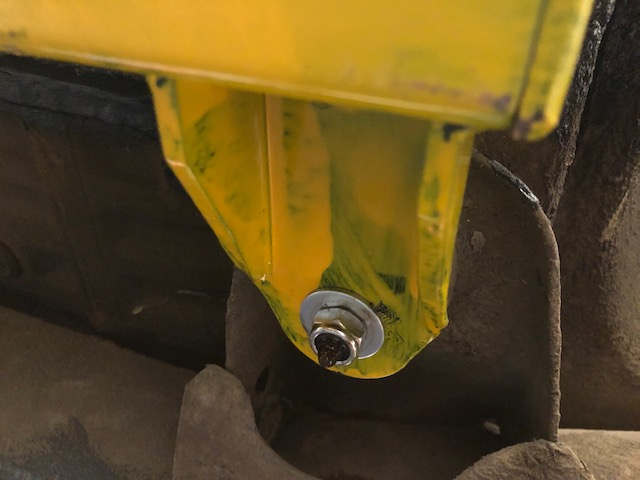
In front of the doors
Behind the doors
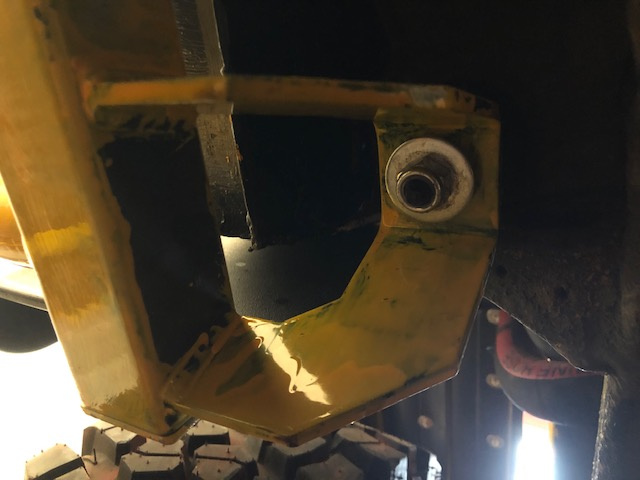
The big chassis bracket
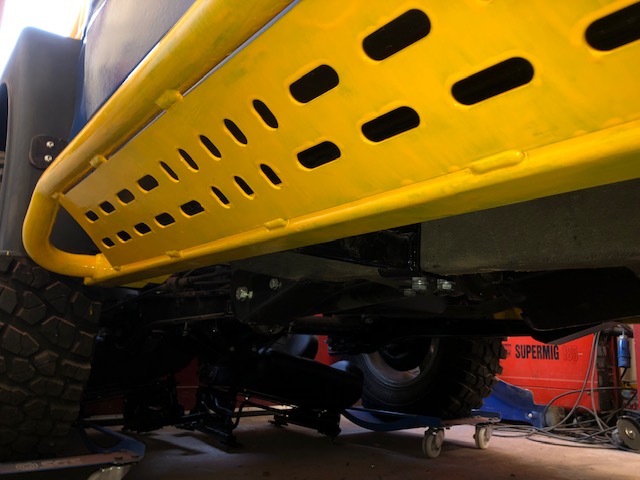
Looking good, and very yellow! Shame to scratch them?! :evil:
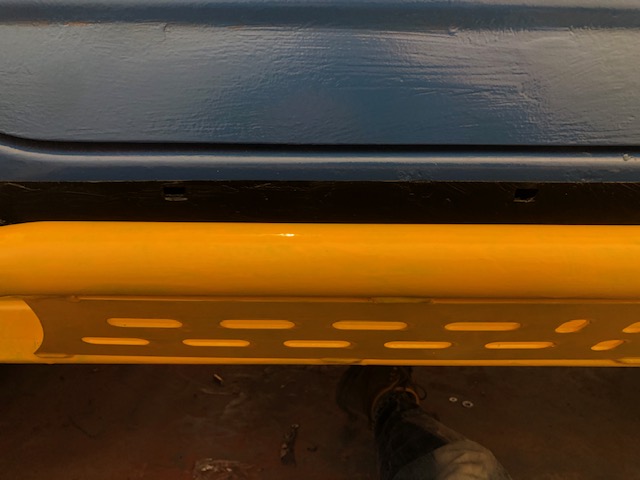
Nice lines too... blue body meets black underseal meets yellow side protection bars :evil:

I then reassembled everything on the transmission tunnel, but had to pop out for some big fat self tappers to replace the rusty ones around the transfer stick... no point painting the frame that holds the boot down and refitting rusty old screws is there? New self tappers fitted in the two trims around the gearstick and the handbrake too... and treated them with some secret magic cleaner first...
I was then going to refit the seats... BUT... what about the wiring? I'd only have to take the seats back out again to get to it, so mught as well do that first?!...

Ten-way connection box on the floor, and twelve wires in the wiring loom on the nearside...
I cut the loom off leaving plenty to route into the connection box and then started fathoming out all the wires, turning things on one by one... I managed to find...
A common earth that branched into a few other earths
Rear Lights
Brake 1
Brake 2
Reverse
Nearside Indicator
Offside Indicator
Foglight(s)
And a fatter white wire that is permanent live? Not switched on the ignition?
And three further wires which I could not identify... So I had a bit of a Google and emailed Martin the font of all Jimny knowledge, and between these two excellent resources (THANKS Martin!) I managed to work out that they'll be...
Rear Wiper (even though it's a soft-top donor, the loom is probably common)
Rear Windows demister (ditto)
Rear Door courtesy light switch
Rear Door Central Locking?
Although there is a smaller loom on the offside -
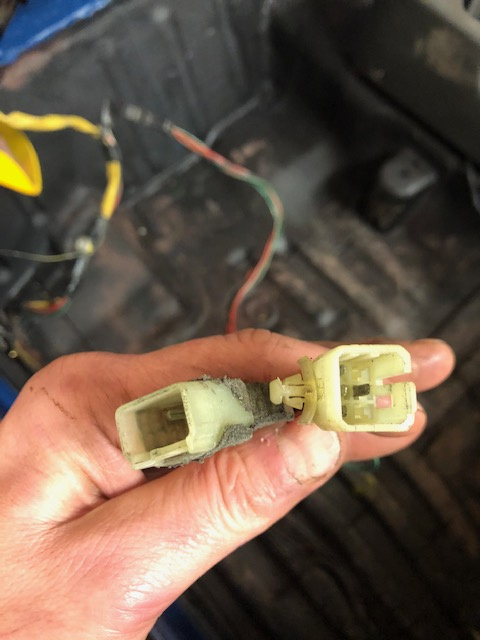
To these two plugs, which I would assume (yes, I should have written it down two years ago!) would go into the rear door, as it's hinged on that side...
But, I have all the wires I need... so I'll wire them into that big ten-way connector box soon, and then extend to the back lights too...
Also, yesterday, I ordered myself...

A "replica" (i.e. cheap!) Suzuki biker leather jacket, to keep me warm, dry and stop the bushes battering and scratching me! It also matches the colour of the buggy of course, and is generic Suzuki, i.e. not "GXR-S" model or "Rizla" Racing Team, etc... So that's where my Christmas money went!
This made me laugh... as I was putting my boots on to go out to the garage, the Labradors thought they were getting a walk so sat on the stairs waiting for me... alas it was persisting it down... Sorry guys!
That's Buddy at the bottom of the stairs and Milo at the top... although we should have called in Gromit! :woohoo:
Anyway...
I started by reattaching the newly painted (three coats of JCB Yellow) JimnyBits sidebars...
New fastenings all round... metric fine 12mm and 10mm nuts with oversize washers for the bodymounts either side under the (half) doors, and some new M12s to bolt the sidebars to the chassis brackets, with spring washers...
In front of the doors
Behind the doors
The big chassis bracket
Looking good, and very yellow!
Shame to scratch them?! :evil:Nice lines too... blue body meets black underseal meets yellow side protection bars :evil:
I then reassembled everything on the transmission tunnel, but had to pop out for some big fat self tappers to replace the rusty ones around the transfer stick... no point painting the frame that holds the boot down and refitting rusty old screws is there?
New self tappers fitted in the two trims around the gearstick and the handbrake too... and treated them with some secret magic cleaner first... I was then going to refit the seats... BUT... what about the wiring? I'd only have to take the seats back out again to get to it, so mught as well do that first?!...
Ten-way connection box on the floor, and twelve wires in the wiring loom on the nearside...
I cut the loom off leaving plenty to route into the connection box and then started fathoming out all the wires, turning things on one by one... I managed to find...
A common earth that branched into a few other earths
Rear Lights
Brake 1
Brake 2
Reverse
Nearside Indicator
Offside Indicator
Foglight(s)
And a fatter white wire that is permanent live? Not switched on the ignition?
And three further wires which I could not identify... So I had a bit of a Google and emailed Martin the font of all Jimny knowledge, and between these two excellent resources (THANKS Martin!) I managed to work out that they'll be...
Rear Wiper (even though it's a soft-top donor, the loom is probably common)
Rear Windows demister (ditto)
Rear Door courtesy light switch
Rear Door Central Locking?
Although there is a smaller loom on the offside -
To these two plugs, which I would assume (yes, I should have written it down two years ago!) would go into the rear door, as it's hinged on that side...
But, I have all the wires I need... so I'll wire them into that big ten-way connector box soon, and then extend to the back lights too...
Also, yesterday, I ordered myself...
A "replica" (i.e. cheap!) Suzuki biker leather jacket, to keep me warm, dry and stop the bushes battering and scratching me! It also matches the colour of the buggy of course, and is generic Suzuki, i.e. not "GXR-S" model or "Rizla" Racing Team, etc... So that's where my Christmas money went!
Last edit: 30 Dec 2020 17:04 by X8GGY.
The following user(s) said Thank You: Soeley
Please Log in or Create an account to join the conversation.
- jackonlyjack
-

- Offline
- Platinum Member
-

Registered
Less
More
- Posts: 2990
- Thank you received: 674
30 Dec 2020 17:22 #231337
by jackonlyjack
Replied by jackonlyjack on topic Dave's la(te)st buggy build...
Nice touch that jacket
The following user(s) said Thank You: X8GGY
Please Log in or Create an account to join the conversation.
Less
More
- Posts: 9257
- Thank you received: 1856
30 Dec 2020 17:46 #231340
by Lambert
Temeraire (2018 quasar grey automatic)
One of the last 200ish of the gen3s, probably.
ADOS Attention Deficit Ooooh Shiny!
Replied by Lambert on topic Dave's la(te)st buggy build...
Ooh branded merchandise, I love a good bit of matching merch!
Temeraire (2018 quasar grey automatic)
One of the last 200ish of the gen3s, probably.
ADOS Attention Deficit Ooooh Shiny!
The following user(s) said Thank You: X8GGY
Please Log in or Create an account to join the conversation.
Less
More
- Posts: 3727
- Thank you received: 923
02 Jan 2021 10:17 #231416
by X8GGY

Usual fast and efficient service from Vehicle Wiring Products...
Cable - 7 core, 3 core and 2 core
Heat-shrink
Relay for flashing main beam and the LED bar
Cable mounting tabs
Guess what I’m doing tomorrow then...? :silly:
Replied by X8GGY on topic Dave's la(te)st buggy build...
Usual fast and efficient service from Vehicle Wiring Products...
Cable - 7 core, 3 core and 2 core
Heat-shrink
Relay for flashing main beam and the LED bar
Cable mounting tabs
Guess what I’m doing tomorrow then...? :silly:
Please Log in or Create an account to join the conversation.
02 Jan 2021 11:54 #231422
by Soeley
Black 2019 Jimny SZ5
www.bigjimny.com/index.php/forum/8-my-ji...ley-s-2019-black-sz5

Replied by Soeley on topic Dave's la(te)st buggy build...
Can you shed a bit more light for us? ")
Black 2019 Jimny SZ5
www.bigjimny.com/index.php/forum/8-my-ji...ley-s-2019-black-sz5
The following user(s) said Thank You: X8GGY
Please Log in or Create an account to join the conversation.
Time to create page: 0.248 seconds