King pin bearing change

![]() The content of any article might be expanded / improved in the future - revisit it sometimes.
The content of any article might be expanded / improved in the future - revisit it sometimes.
![]() Seen a mistake? Know something that isn't written? Edit and change this article yourself!
Seen a mistake? Know something that isn't written? Edit and change this article yourself!
![]() Some images in the article (if present) can be enlarged by clicking on them.
Some images in the article (if present) can be enlarged by clicking on them.
Contents
Introduction
If you off-road a Jimny (or any of the Suzuki classic 4wd vehicles) then this is a job you will become familiar with.
It is also one of the worst in my opinion, not because it is difficult, but because of the smell, you will find out what I mean later.
It is also closely tied in with changing/working on the wheel bearings so some of the steps are duplicated.
Symptoms and diagnosis of wear out
The symptoms of worn king pin bearings:
- Steering "shimmy";
- Read the introduction chapter of the Death Wobble wiki article to learn what a "shimmy" steering actually means.
- Oil/grease leaking from a swivel joint (see the picture below) - this is an obvious symptom;
- Swivel joint is the large ball-like surface on each axle end, around/on which a front wheel rotates left-right when steered;
- The leaking gunk is actually differential oil from inside the axle itself, mixed with the grease from inside the steering knuckle;
- The differential oil is leaking through the worn out halfshaft oil seal, which has failed because worn out king pin bearing(s) caused the steering knuckle assembly to put pressure on the seal at improper angles;
- Vertical play in the front wheel when it's hovering above ground;
- How to diagnose:
- Jack up a front wheel in the air (and put that part of the vehicle a stand);
- Grip the wheel with your hands at its top and bottom and rock it;
- If there is slack/movement in the wheel while rocking it vertically, get an assistant to press the brakes while you are rocking the wheel;
- If the wheel still wobbles while being rocked (and the brakes being pressed simultaneously), then congratulations - the king pin bearing(s) for that wheel are worn.
- If the wheel does not wobble while the brakes are being pressed (but wobbles when the brakes are not being pressed), then look at the wheel bearing.
- How to diagnose:

Special exception:
- It is also common not to experience any play at all and to even pass an MOT with a really bad king pin bearing.
- This is because the bottom bearing in particular can rust solid, so no play or leaking is detectable.
- The worst Jimnys for this are often the "one careful lady owner" ones.
- They have sat for long periods on the driveway with the bottom king pin bearing "securely" rusting away in the steering knuckle.
- The only certain way to check out these kind of "specimens" is to actually disassemble the steering knuckle assembly and visually and physically inspect the insides.
- Well in that case you might as well perform the entire replacement procedure (as described in this guide) anyway ...
Prerequisites
Before embarking onto any work, first comes the overview of the prerequisites.
Required parts
The table
| Part name | Quantity | Suzuki P.N. | Aftermarket replacements | Comments |
|---|---|---|---|---|
| King pin bearing |
2 pieces | 09265-15006 | Any bearing make of type "30302J", like:
|
|
| Halfshaft oil seal |
1 piece | 09283-26016 | Any seal with dimensions:
|
|
| Steering knuckle swivel seal |
1 piece | 45120-81A04 | Febest SZOS-001 |
|
| Differential oil |
1.1 - 1.65 litre |
Who cares? | See this and this wiki articles for important details! |
|
| Heavy duty grease(s) |
A handful or so |
? |
| |
| Gasketing sealant |
A small tube |
? |
| |
| A calendar with pictures of (half)naked women |
12 pictures / months |
Probably with portraits of Suzuki's female employees |
|
|
Parts offered in BigJimny Store
The BigJimny Store has the following parts from the above table on sale:
- The basic kit has the two king pin bearings and the small halfshaft oil seal (the first two items from the above table), which are required to do one side.
- The full kit has the same contents as the basic kit, plus the large swivel / knuckle seal (the 3rd item from the above table), although some people choose not to change that seal.
- A suitable heavy duty waterproof grease;
- A suitable sealant for king pins;
- Sorry, no calendars with pictures of naked women (nor men for that matter) are in store's offer (yet)!
Notes about greases
General notes about the selection and application of greases:
- A super-durable water-and-mud-and-everything-else resistant grease(s) is essential to protect the steering knuckle assembly, the CV joint and especially the king pin bearings from ingress of grit, water and mud.
- Those contaminants will certainly (rather sooner than later) enter into the steering knuckle.
- Jimny's steering knuckle is poorly sealed by design - this is one of Jimny's main mechanical weaknesses.
- Once inside, the contaminants will immediately (by the course of gravity) proceed towards the lower king pin bearing.
- If the contaminants in the steering knuckle are present in significant quantities, not even the upper king pin bearing nor the CV joint will remain out of their reach.
- If a grease with inadequate water, oil, grit and temperature resistance is used, the contaminants will quickly mix with the grease and eat away the bearings and even possibly the CV joint.
- In certain "dirty / wet" situations, your newly rebuilt, shiny front steering knuckle assembly can get devastated again in just a couple of months of hard use.
- The solution against the ingress of contaminants is not to overfill the bearings, the CV joint or the steering knuckle with blobs of grease in order to physically block their ingress.
- The solution is to use a suitable heavy-duty all-resistant grease in normal quantities.
- The lists of recommended aftermarket greases in the above table is by no means complete.
- Others are welcome to add their own recommendations to the lists!
Additional notes on Maxima 80916 grease:
- This heavy duty lithium grease is the grease of choice in BigJimny shop.
- It has proven itself very well in practice with several Jimny owners for lubricating and protecting king ping bearings, especially in Martin's many years of experience with it.
- Martin should just clarify if this grease is well suitable for CV joints and wheel bearings too (it probably is).
Additional notes on Divinol 23980 grease:
- Forum user Bosanek has had excellent experience with this calcium grease.
- I used it only for the king pin bearings and for the steering knuckle.
- This grease is truly wicked - fluorescent green, super thick, very sticky and gooey, like a "slime from another galaxy".
- The steering knuckle wes opened after a year of hard use (after initially coating the king pin bearings and the steering knuckle with this grease) in order to replace a wheel bearing.
- It was like a mass grave inside.
- However, this Divinol grease still repelled all the grit and sh*t away from itself (and from the king pin bearings) - still keeping the bearings fully and cleanly greased!
- It was like a mass grave inside.
- On the other hand, this Divinol 23980 grease might not be suitable for use in a CV joint nor in a wheel bearing.
- The most important reason against using it in a wheel bearing is because it has relatively low temperature resistance - only up to 110 degrees C.
- Although a CV joint should not get nearly as hot as a wheel bearing, it can occasionally rotate at high speeds and high loads (example: going fast uphill in a bend), and since this grease is very thick and very "gooey", it might not lubricate properly then.
- Being thick and gooey does not mind at all for the king pin bearings (it's actually desirable), as they do not endure high velocity movements, very high temperatures or high torques and do not need precise lubrication viscosity and other lubrication properties (they "just" pivot around the wheel hub assembly with the wheel).
- Somebody has yet to try this grease in a CV joint and report the long-term effects.
Additional notes on Abro LG-990 grease:
- Forum user Bosanek has had very good experience with this fully synthetic lithium grease when used in a CV joint and in a wheel bearing.
- It has a rather high heat resistance (almost 300 C liquifying point) and still claims good resistance against contaminants.
- However, it does not feel nearly as "tough" in the hands as the really wicked Divinol 23980 grease.
- But on the other hand, it is a "safe bet" to keep the sensitive CV joint and the hot-loaded wheel bearing properly greased in all operating conditions.
Required tools
- Standard metric sockets and spanners
- Assorted screwdrivers
- Circlip pliers (external)
- An E10 Torx socket for the vacuum hub head bolts
- A ball joint splitter
- 1" imperial socket
- G-Clamp or brake piston retractor
- A Big F.....g Hammer (only if you have anger management problems)
Changing the bearings
The Video
Before you read the guide below, you may wish to view the video.
This shows the changing of the Kingpin Bearings on a Jimny fitted with ABS so you will see me remove the sensor etc.
The rest of the guide below shows the same task in a series of steps for clarity.
Removing the Caliper and pads

First of all secure the car. Then release the wheel nuts and jack up the car and remove the road wheel. This then reveals the brake caliper. The picture shows the passenger side (nearside) caliper (UK).

Using a 12mm spanner, release the front caliper bolt (the left is the front of the car in this picture). Then loosen the same bolt on the rear of the caliper.

The caliper then opens up using the rear bolt as a hinge.

The pads are retained by small spring clips. A simple pull on the pads (horizontally away from the disk) should remove them. If the pads resist, gently prise out the pads with a small screwdriver - do not remove the spring clips. If you require new pads, spring clips or a caliper fitting kit then these are available in the BigJimny Store.
Removing the Brake Disc

The caliper is held on with two bolts at the rear (see below).

Release the bolts and tie the caliper to the spring to keep it out of the way.

Now the front brake disc can be removed. If you are lucky it will simply pull off, but if you have problems then there are two M8 holes in the disk hub. Simply run two bolts into these holes and the disk will push off the hub. The picture below shows a bolt being used to push the disk off the hub.
My disk appeared to be ok on the visible side but the rear showed some bad wear so I will change them as part of this job. New disks are available in the BigJimny Store.


Dismantling the Hub

Now the Freewheeling Hub needs to be removed. Suzuki have used Torx bolts to secure these so you will require an E10 socket to remove the bolts.

With the hub removed, the driveshaft is exposed. The driveshaft is retained with a circlip, so use a pair of circlip pliers to remove it. This is really fiddly and can be an annoying task. Behind the circlip is a rectangular washer that should also be removed. Note that I have also marked with white paint the orientation of the freewheeling hub, this is not strictly needed.

Gently pull the two vacuum hoses for the hub from the knuckle, making sure you note which one connects to each pipe. It is essential that you get this correct, else the hub will not work again. Also note that if you have an ABS equipped vehicle then you will have to remove the sensor. I do not have photos of this but the video shows it.
![]() It is really easy to shear the ABS bolt! If you can, soak it for a couple of days previously in penetrating oil.
It is really easy to shear the ABS bolt! If you can, soak it for a couple of days previously in penetrating oil.

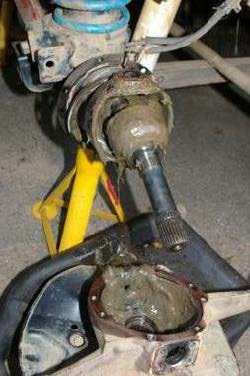
At the rear of the hub, release the small bolts holding the seal and retainer. You can see that the swivel hub is covered in oil, a bad sign for KingPin problems.

Undo the nuts on the steering joints. If the joint rotates, then put a jack under the joint and lift the car slightly to lock the joint. Using a splitter, split the steering joints (two to do on the passenger side and one on the drivers side – UK).

Finally, release the KingPin bolts themselves. There are two sets, top and bottom and they must not be mixed up. You can see in the picture that I have marked them up with a letter T.
If you are doing both sides at once then do not mix them across either!
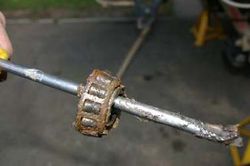
The KingPins are also held in with sticky sealant so you will need to prise them out. The hub will now pull off. Beware, if they are badly worn the hub will be full of stinking grease, oil and water so make sure you can capture the mess in something. This is the bit I hate because of the smell!
- That’s water pouring out of the axle! Also shown is a worn out bearing.
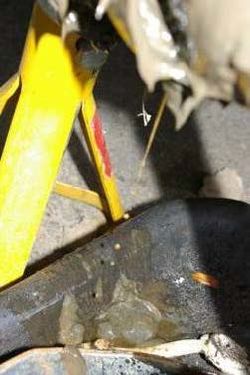


The thing to remember is that it is not a Land Rover, which has oil filled swivels. The joints on Jimnys should be "dry" apart from some lubricating grease.
The next stage is to CLEAN, CLEAN and then CLEAN again. Clean the swivels inside and out, clean the knuckles and pull out the drive shaft and clean that as well.
The rebuild

Once clean you can start the rebuild process. The KingPin bearings come in two parts, the race and an outer ring. This ring is still in the swivel and needs driving out.

A simple way to drive them out is to use a 1" Imperial socket. Using an extension bar fed through the swivel, place the 1" Socket behind the ring and drive it out by hitting it. Picture from Dave at Bits4Vits
The new rings can then be driven into place with a piece of wood to protect them from the hammer. Again, this is seen in the video (picture needed here).
I also hooked out the small axle shaft oil seal and put a new one in from the BigJimny kit. (picture needed here).

Here is the completed swivel with new rings and oil seal (and plenty of copper grease to help them all into place.
If you are changing the large seal then now is the time to put the new one on. The confusing part is the order of the seals and rings on the swivel. The pictures below show the correct orientation. Note also that the slits in the retainers go to the top.


Pack the CV with grease (but do not overpack) and re-fit the driveshaft.

Grease the new KingPin bearings and insert the top one in the carrier. I find the easiest way to grease the bearings is to put them in a polythene bag with some grease. Then use the bag to squeeze the grease into the bearing, this can be seen in the video. (picture needed here). Carefully insert the new bottom bearing and, holding it in place, slide the whole knuckle onto the hub. Fill the Knuckle with 100ml of grease, Suzuki recommend only 100ml and not to overfill. Now the KingPins need to be inserted, but first they need a bead of sealant around the KingPin. Before adding the sealant make sure that the mating surface on the kingpin and the hub and thoroughly cleaned.
Make sure that you have put the correct Kingpin in place, remember you should have marked them when you dismantled it! Bolt the Kingpins in and tighten them to the correct torque (18ft/lbs). Refit the steering arm (or arms if it is the side with two connections), tightening the nuts to 31ft/lbs. Fit the disk and fit the caliper (Caliper bolts 61ft/lbs), brake pads and bolt the caliper down in position (Caliper pin bolt 16/ft/lbs). Re-fit the wheel and lower the vehicle.
Torque Settings
Full details of the torque settings can be found in the reference data
Page last edited on 28/11/2019 by user Bosanek