2WD-only Jimny to 4WD retrofit

![]() The content of any article might be expanded / improved in the future - revisit it sometimes.
The content of any article might be expanded / improved in the future - revisit it sometimes.
![]() Seen a mistake? Know something that isn't written? Edit and change this article yourself!
Seen a mistake? Know something that isn't written? Edit and change this article yourself!
![]() Some images in the article (if present) can be enlarged by clicking on them.
Some images in the article (if present) can be enlarged by clicking on them.
Contents
- 1 Introduction
- 2 2WD-only Jimny transmission setup
- 3 2WD-only Jimny transmission and suspension pictures
- 4 Required parts for 4WD refitment
- 5 Retrofitment guide
- 6 Testing the 4WD transmission
- 7 Final steps
Introduction
- Suzuki used to produce an "el-cheapo" 2WD-only (rear wheel drive only) Jimny edition in the early production years (probably around 1999-2003).
- These Jimnys are quite rare, but still appear here and there from time to time on the used car market.
- 2WD-only Jimnys usually have (almost) no additional equipment.
- Examples of additional equipment: longitudinal roof rails, power steering, power side windows, power mirrors, ABS, air conditioning, front fog lamps, etc.

2WD-only Jimny exterior

2WD-only Jimny interior


However, a 2WD-only Jimny might still be a compelling purchase.
- Reason 1: They are usually very cheap on the used car market.
- Reason 2: A 2WD-only Jimny can be easily retrofitted with missing 4WD mechanics for a relatively low cost.
Therefore, a 2WD-only Jimny in good condition, after being retrofitted with 4WD transmission, can be a cheap and reliable, albeit a rather basic (non-comfort equipped) all-terrain vehicle.
The purpose of this article is to provide guidelines on how to retrofit the missing 4WD system components into a 2WD-only Jimny, in order to transform it into a "full" 4WD Jimny (just like any other "normal" Jimny). The resulting vehicle will be fully equivalent to a factory 4WD Jimny, except for having manually operated or fixed front wheel hub heads instead of vacuum operated front wheel hub heads, which is actually a more robust solution.
![]() If you already have a "normal" 4WD Jimny, you do not need to read this article. Go 4WD-ing already!
If you already have a "normal" 4WD Jimny, you do not need to read this article. Go 4WD-ing already!
![]() Beware that this entire retrofit guide was written by an author who has not personally performed the retrofit.
Beware that this entire retrofit guide was written by an author who has not personally performed the retrofit.
The guide is primarily based on a summary tale which was told to the author by another Jimny user who has successfully performed this retrofit.
Author added the missing information based on his own research into Suzuki's documentation and some general knowledge about Jimnys.
2WD-only Jimnys main specifications
- Most (if not all) 2WD-only Jimnys have G13BB engine, and therefore the same corresponding gear box and rear differential as ordinary 4WD Jimnys from the same era.
- All 2WD-only Jimnys have the same body, chassis and interior trim as ordinary 4WD Jimnys from the same era.
- All 2WD-only Jimnys have all the same suspension components as ordinary 4WD Jimnys.
- Most (if not all) 2WD-only Jimnys use all five wheels of the same size as 4WD Jimnys (15 inch x 5.5J), but they originally came with tyres in size 175 / 80 / R15.
- Most owners have changed the tyres in the meantime to the typical Jimny size of 205 / 70 / R15.
- They did it probably just because they saw that size being used on "normal" 4WD Jimnys and because wider tyres look cooler.
- Most owners have changed the tyres in the meantime to the typical Jimny size of 205 / 70 / R15.
2WD-only Jimny transmission setup
These are the transmission system components of 2WD-only Jimnys which are the same as in 4WD Jimnys:
- Manual gear box;
- Propeller shaft between the gear box and the transfer box;
- Propeller shaft between the transfer box and the rear differential;
- Entire rear axle assembly;
- Rear axle assembly consists of: rear axle casing, rear differential, pair or rear halfshafts and a pair or rear wheel hubs which contain the wheel bearings.
- Beware that some elements of the rear axle assembly differ for ABS and non-ABS equipped Jimnys.
- Rear axle assembly consists of: rear axle casing, rear differential, pair or rear halfshafts and a pair or rear wheel hubs which contain the wheel bearings.
- All suspension components;
- These are: front and rear radius arms, front and rear panhard rods, front tie rods and tie rod ends, all coil springs, all shock absorbers, etc.
![]() The front panhard rod and the rear coil springs differ between LHD and RHD Jimnys (more details in this wiki article).
The front panhard rod and the rear coil springs differ between LHD and RHD Jimnys (more details in this wiki article).
These are the transmission system components which are specific in 2WD Jimnys:
- "Dummy" transfer box;
- This transfer box has only a simple fixed mechanism inside, just to physically inter-connect the gear box with the rear differential.
- There is no lever in the cabin to control this transfer box, as there is nothing to control in it anyway.
- Technically, the gearbox could have been connected directly to the rear differential through a very long propeller shaft.
- However Suzuki chose to use this dummy transfer box in the middle, probably to keep the parts stock unified (to reuse the same small and rear propeller shafts as in 4WD Jimnys).
- The casing of this transfer box is almost the same as the casing of a normal mechanically operated Jimny transfer box.
- The casing was kept the same in order to keep the same distances for the propeller shafts toward the gear box and the rear differential.
- However, this dummy transfer box casing has no "interface" for the front propeller shaft (toward the front differential).
- Therefore, it would be impossible to connect the front propeller shaft to this dummy transfer box even if all the proper 4WD gearing inside it was reinstalled.
- Hollow ("dead") beam front axle assembly.
- The front axle casing is hollow, and it does not even have a front differential casing.
- It's a single-piece hollow tube from one wheel hub to another.
- There is no pair of front halfshafts either, and no constant velocity joints in the wheel hub assemblies.
- The front axle casing is hollow, and it does not even have a front differential casing.
- Front wheel hub heads are (most probably) fixed or they do not exist at all.
- The front wheel hub assemblies still contain a pair of king pins and a pair of king pin bearings, and a wheel bearing too with a couple of seals.
- However, many small pieces in the front wheel hub assemblies are missing (like some seals, retainer rings etc. which are part of the vacuum sealing system in 4WD Jimnys).
These are the transmission system components which are non-existent in 2WD Jimnys:
- Front differential.
- Propeller shaft from the transfer case to the front differential.
- Vacuum system (pipes, solenoids, tank, etc.) for the front wheel hub heads.
- 4WD controller computer.
2WD-only Jimny transmission and suspension pictures
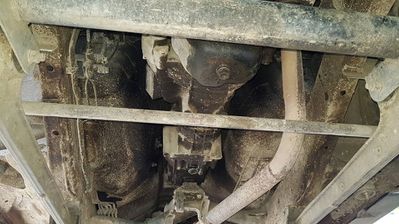
- Dummy transfer case, close-up
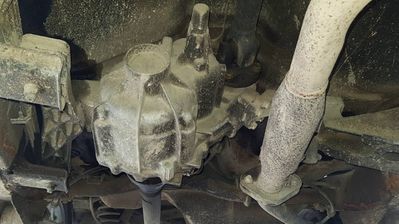
View from the front side of the vehicle

View from the right side of the vehicle
View from the left side of the vehicle
- Notice the absence of a connector for the front propeller shaft (toward the front differential).
- Notice a set of wires connected to the transfer case - that's probably just for the speedometer.
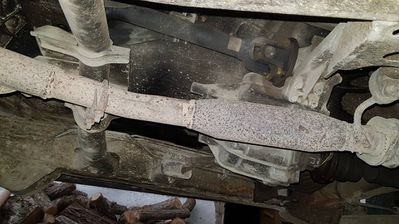
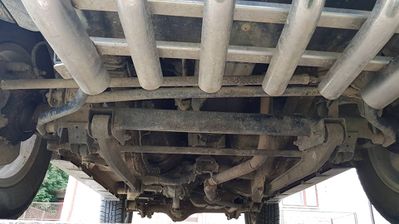
- Dummy transfer case and surroundings

View from the front side of the vehicle
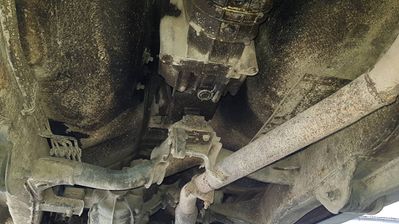
The transfer box and the gear box
View at the rear part of the vehicle
- Notice the absence of the front propeller shaft.
- Notice that the rear section of the vehicle's underbody is the same as in a proper 4WD Jimny.
- Gear box

View from the right side of the vehicle
View from the front side of the vehicle


- The gear box should be the same as in proper 4WD Jimnys from the same era.
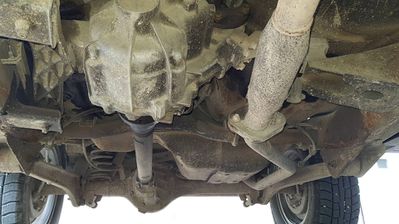
- Front axle, center part
Complete overview of the front axle
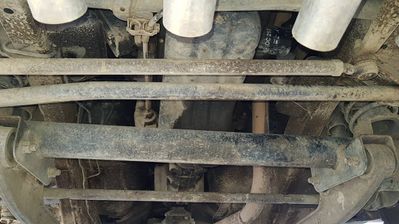
Close-up on the center section


- Notice the complete absence of the front differential case.
- The front axle is just a single-piece hollow tube - called a "dead solid axle".
- Front axle, at front wheel hub connection
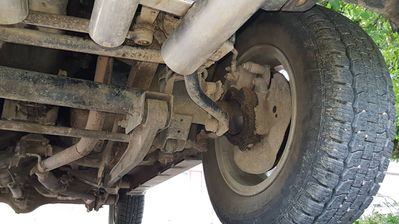
Front left wheel
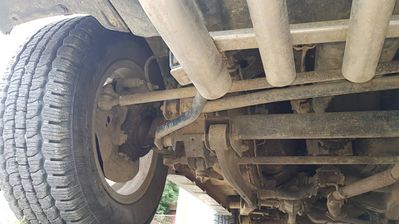
Front right wheel


- Everything on the pictures is exactly the same as in 4WD Jimnys.
- Exceptions:
- The lack of vacuum pipes for the front wheel hub heads;
- No connections for the vacuum pipes on the front wheel hubs;
- No ABS sensors on the front wheel hubs (although some 4WD Jimnys also lack ABS);
- Front axle, at front wheel hub connection - close-up

Front left wheel
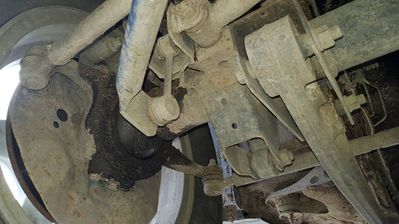
Front right wheel


Required parts for 4WD refitment
In short, the following items are needed from a proper 4WD Jimny:
- Complete lever-shifted transfer case;
- Front propeller shaft;
- Complete front axle + front diff + a pair of complete wheel hubs assembly;
- Optional: A pair or manually operated free wheeling front wheel hub heads;
- Optional: Some oils, bolts and bushes;
The retrofit procedure is relatively simple (essentially mostly just bolting-unbolting activities). So no expert mechanical skills are required. The only issue which is likely to arise is encountering stuck/seized bolts.
However, some stuck bolts may introduce significant additional work. For example, forcibly removing a stuck radius arm to axle bolt will probably damage the bushing in the radius arm. This will require complete removal of the radius arm and replacement of the damaged bushing, which requires a heavy-duty press.
![]() In some countries a vehicle recertification might be required after the retrofit, because the weight on the front axle has increased and/or because total vehicle weight has increased.
In some countries a vehicle recertification might be required after the retrofit, because the weight on the front axle has increased and/or because total vehicle weight has increased.
Transfer case, mechanically operated
- A standard, mechanically operated Jimny transfer case with all the gearing inside, together with a mechanical operating lever.
- This transfer case model was used in Jimnys built from year 1998 to year 2005.
- This transfer case model is bolt-on compatible and will fit into a 2WD-Jimny like it's an original installation.
![]() Newer (2005+) electrically ("push-button") operated transfer case is not suitable.
Newer (2005+) electrically ("push-button") operated transfer case is not suitable.
Front propeller shaft
- This is the propeller shaft between the transfer case and the front differential.
- Front propeller shaft from any Jimny should fit.
- Even propeller shafts from newer Jimnys with push-button operated transfer box should be the same.
- If the universal joint in the front propeller shaft is worn, you will also need a new universal joint.
- It is best to preventively install a new universal joint at this point while the propeller shaft has not yet been mounted.
![]() The wiki article "Universal joint replacement" contains further details.
The wiki article "Universal joint replacement" contains further details.
Entire front axle assembly
This consists of:
- Front axle casing (tube);
- Front differential;
- Pair of front half shafts;
- Pair of Constant Velocity (CV) joints;
- Pair of front wheel hub assemblies;
- These consist of a wheel hub casing, pair of king pins, pair of king pin bearings, wheel bearing, and a lot of seals, c-clips, rings and other small parts.
Vehicle junk yards usually sell the front axle as this complete assembly, and buying it as a complete assembly should be the cheapest way anyway.
It is recommended to obtain the front axle assembly which contains "Type 1" CV joints. In other words, avoid front axle assemblies with "Type 2" CV joints and definitely avoid those with "Type 3" CV joints. The reason for this preference is that varied and common aftermarket replacement market exists only for type 1 CV joint, while the aftermarket support for type 2 is very poor (only one or two manufacturers) and completely non-existent for type 3. Type 1 CV joints were used in most Jimnys built from 1998 to 2005.
![]() Jimny CV joint "type" designations are not official Suzuki designations. They were made up in this wiki documentation to easily differentiate the three different CV joint models instead to referring to them by their long part number markings.
Jimny CV joint "type" designations are not official Suzuki designations. They were made up in this wiki documentation to easily differentiate the three different CV joint models instead to referring to them by their long part number markings.
![]() Much more info on CV joints in Jimnys exists in the article "CV joint replacement".
Much more info on CV joints in Jimnys exists in the article "CV joint replacement".
Pair of front wheel hub heads
There is a choice to make here - to have fixed hub heads or free wheeling hub heads. This chapter will only provide some rough guidelines.
![]() The wiki article "Manual or fixed front wheel hub heads" contains all the information (and more than that) about choosing and installing manual or fixed front wheel hub heads on a Jimny.
The wiki article "Manual or fixed front wheel hub heads" contains all the information (and more than that) about choosing and installing manual or fixed front wheel hub heads on a Jimny.
![]() Concentrate primarily on part 1 (solutions 1a through 1d) in that article, as the other parts of that huge article are not that important for this project.
Concentrate primarily on part 1 (solutions 1a through 1d) in that article, as the other parts of that huge article are not that important for this project.
Solutions with fixed hub heads
Original vacuum operated free wheeling hub heads from a 4WD Jimny can be quite easily fixated so that they become permanently engaged. This solution makes the most sense if the vehicle will spend most of its driven time off-road.
Advantages:
- No additional parts are required in this case, as these hub heads usually come together with a complete Jimny front 4WD axle assembly from a vehicle junk yard.
- It will not be needed to install the vacuum system nor the 4WD control computer, as the hub heads will always be engaged.
Disadvantages:
- With fixed hub heads, the front drivetrain will always be connected to the road wheels.
- This means that all the bits (CV joints, halfshafts, front differential) will always spin, no matter if the vehicle is in 2WD or 4WD mode.
- However, the transfer case lever still controls if the front propeller shaft is connected to source of the power in the transfer case or not.
- This means that, when the vehicle is in 2WD mode, the front drivetrain will be disconnected from the engine, so all those mechanical pieces in the front drive train will rotate in "free air" (by the motion of the front wheels) with negligible constant wear and slight fuel consumption waste.
Solutions with free wheeling hub heads
This solution makes more sense than using fixed front wheel hub heads if the vehicle will spend a significant portion of its driving distance on road.
- It is not recommended to install original vacuum locking front free wheeling wheel hub heads from a 4WD Jimny.
- In that case, an entire vacuum system (solenoids, switches, pipes, tank, etc.) would then have to be retrofitted as well, as well as the 4WD control computer.
- This would make the entire 4WD transmission retrofit procedure a much more complicated endeavor than it actually is.
- In that case, an entire vacuum system (solenoids, switches, pipes, tank, etc.) would then have to be retrofitted as well, as well as the 4WD control computer.
- A much simpler and more robust solution is to install manually operated free wheeling front wheel hub heads instead.
- These do not require the presence of any vacuum system element nor the presence of 4WD control computer.
- The only disadvantage is having to buy a pair of manual hub heads too.
- These can be either second hand from a Samurai or Vitara (+ adapter rings) or aftermarket tailor-made ones for Jimnys.
Some bolts and bushes
- If some of the bolts which connect the front shock absorbers, radius arms, panhard rod, anti roll bar links, etc. to the front axle happen to be seized, you will have to cut them off.
- A seized bolt in a bush usually means that it can not be taken out without destroying the bush too.
Therefore, you might need the following replacement bolts and bushes:
- Front shock absorber to front axle bolt and bush (two pairs in the worst case);
- Front radius arm to front axle bolts and bushes (four pairs in the worst case);
- Front panhard rod to front axle bolt and bush (one pair).
- Front anti roll bar to front axle link assemblies (two).
- Front tie rod ends (four in the worst case).
Transmission and brake oils
- You will need need some oils for the newly acquired front differential and for the newly acquired transfer case.
- While you are at it, you should also change oils in the gear box and in the rear differential too.
- Since brake pipes will temporarily be disconnected from the front brakes, some air will probably enter the brake system.
- Therefore, an air purge from the brake system will probably be necessary.
- Why not change the entire brake fluid at the same occasion.
- Therefore, an air purge from the brake system will probably be necessary.
- Required oil specifications and quantities are written in the Regular maintenance intervals and consumables wiki article.
Additional considerations regarding required parts
Propeller shaft mounting positions
- Beware that it is very important to mount every propeller shaft to the connecting devices (example: differential, transfer case, etc.) exactly as it was originally mounted.
- Reason: every propeller shaft was balanced for that mounting position in the factory.
- If it is mounted in a different position, it could cause vibrations while spinning.
- Reason: every propeller shaft was balanced for that mounting position in the factory.
- It is easy to preserve the original mounting positions for the middle and rear propeller shafts, as it is possible to mark them before disconnecting them from the dummy transfer case.
- However, the front propeller shaft has to be obtained from another vehicle, and the information about its original mounting position (in relation to the front differential and to the transfer case) can be lost.
- Therefore, it is highly recommended to obtain the front differential, front propeller shaft and the transfer box all from the same donor vehicle.
- Just don't forget to mark the position of the front propeller shaft in relation to the front differential and to the transfer case before dismounting them from the donor vehicle!
- Therefore, it is highly recommended to obtain the front differential, front propeller shaft and the transfer box all from the same donor vehicle.
- Even if you can not get the luxury of obtaining the front differential + front propeller shaft + transfer case all from the same vehicle and the luxury of finding them still assembled on the donor vehicle (so that you can mark their positions before dismounting them), that may still not be the end of the world.
- If you will be using manually operated free wheeling front wheel hub heads, the front propeller shaft will be turning only when the vehicle is in 4WD-H/L mode.
- This means that it really won't matter that much if the front propeller shaft is imbalanced, as it will (possibly) cause vibrations only in 4WD mode, when you are driving slowly and/or on rough surface anyway.
- Even if you will be using fixed front wheel hub heads, possible vibrations from the front propeller shaft might not be important and/or noticeable if the vehicle will be predominantly used in 4WD-H/L mode on rough terrain and in slow maneuvers.
- If the vibrations from imbalanced front propeller shaft do become an issue, the propeller shaft can always be taken to a specialized workshop for rebalancing.
- Workshops which can do this kind of service are usually the ones which maintain heavy trucks, construction machinery, etc.
Differential gearing ratios
- The gear ratio of the front differential has to be exactly the same as the ratio of the rear differential.
- One (less certain) way of achieving this is to get the parts from a donor 4WD Jimny vehicle which has G13BB engine, as those vehicles should have matching front differentials.
- 4WD Jimnys with non-VVT M13A engines (made from 2001-2005) should also have matching front differentials, but this is not that much certain.
- The other (100% certain) method of achieving this is to measure the gearing ratio of the front differential from the donor vehicle and compare it to the measured gearing ratio of the factory rear differential in your 2WD-only Jimny.
- If the gearing ratios are the same, then you have a match.
![]() The wiki article "Differential information" might contain some useful info.
The wiki article "Differential information" might contain some useful info.
How to measure the gearing ratio of a differential:
- Manually turn the input side of the differential (side onto which the propeller shaft connects) a set number of times (for example 10 full turns) while keeping one output side of the differential jammed.
- Then count how many turns has the other (free) output side of the differential performed for the set number of turns of the input side.
- The gearing ratio is then calculated by dividing the two numbers.
- Example: By turning the input side 10 full turns, the output side has turned 38 turns.
- This results in 3.8 gearing ratio for the differential.
ABS vs. non-ABS vehicles
- The front wheel hub assemblies should be the same for ABS and non-ABS Jimnys.
- Therefore, when obtaining the entire 4WD front axle assembly, you should not worry if the donor vehicle has ABS or not.
- As far as it is known, 2WD-only Jimnys with ABS should not exist (in other words - all 2WD-only Jimnys should be non-ABS), but who knows!
- In the case that your 2WD-only Jimny really has ABS, you will need to add some wiring between the 4WD transfer box and the ABS computer (explained further below).
- Reason: The operation of ABS brakes differs significantly in 4WD modes compared to ordinary 2WD mode, and the ABS computer needs to be aware whenever the transfer box is in one of 4WD modes.
Wheels and tyres
- If your 2WD-only Jimny still has 175 / 80 / R15 tyres, you might want to change them to a more "typical" Jimny size.
- First check if your 2WD-only Jimny still has all five original 15 inch x 5.5J wheels (the same wheels as on 4WD Jimnys).
- If it does, then all the tips below are fully valid.
- First check if your 2WD-only Jimny still has all five original 15 inch x 5.5J wheels (the same wheels as on 4WD Jimnys).
- The factory tyre size for 4WD Jimnys is 205 / 70 / R15.
- Vehicle's ground clearance increases by only 3-4 mm when changing from 175 / 80 / R15 tyre size to 205 / 70 / R15 tyre size.
- However, if you decide on changing tyres, it would be much more sensible to immediately go for a more "all-terrain suitable" tyre size.
- For example, size 195 / 80 / R15 is considered a great tyre size for all-terrain use for 4WD Jimnys.
- Vehicle's ground clearance increases by significant 16 mm when changing from 175 / 80 / R15 tyre size to 195 / 80 / R15 tyre size.
- For example, size 195 / 80 / R15 is considered a great tyre size for all-terrain use for 4WD Jimnys.
- If you decide on changing your wheels and/or tyres, you should change all five, and use all five.
- The wiki article "Tyre selection and usage - best practices" contains a lot of useful info on tyre sizes.
- Note: If you put a wider tyre than the factory width of 175 on a spare tyre position on a 2WD-only Jimny, you need to shorten the rubber tyre "cushions" / spacers on the rear door, because they are longer than on a 4WD Jimny (to properly reach a narrow 175 tyre).
Retrofitment guide
Removing current transmission elements
First of all, raise the entire vehicle up in the air, or position it over a canal with the front end lifted on stands and rear wheels securely locked.
In order to maximize the chances of unscrewing (many) old stuck/seized bolts:
- It is recommended to spray all the bolts which are to be unscrewed with a good anti sieze "WD40-alike" chemical, or a deep freeze effect chemical.
- This should be preferably done at least 12 hours before starting any work, to leave the time for the fluid to penetrate deep in the treads.
- Also, it is better if this is done in at least two iterations, first 24 hours before work, and the 2nd spraying 12 hours before work.
Dummy transfer case removal
- Optional: drain the oil from the dummy transfer box (if it has any oil in it).
- Mark the positions of both propeller shafts in relation to the casing of the dummy transfer box.
- This refers to the rear propeller shaft between the transfer box and the rear differential, and the small propeller shaft between the gear box and the transfer box.
- Put those marks on the new 4WD transfer box in the same spots on which you put them on the dummy transfer box.
- Disconnect both propeller shafts from the dummy transfer box.
- Dismount the dummy transfer box from the vehicle.
- You will not need this transfer box any more.
- It's best to donate it to a technical school so that pupils can study how economics influence engineering decisions.
- You will not need this transfer box any more.
Dummy front axle removal
- Remove both front wheels.
- Disconnect the brake pipes from the front brakes.
- Try to immediately plug the brake pipes with something so that the least amount of brake fluid (which is highly corrosive) leaks out.
- Optional: Dismount the front brake pads, discs and calipers from the wheel hub assembiles.
- This step makes sense only if you intend to reuse the front brake components on the vehicle after fitting the new 4WD front axle assembly.
- Put two stands below the front axle so that it rests on them.
- Disconnect both tie rod ends from the front wheel hub assemblies;
- Optional (if you want to separate the front wheel hub assemblies from the front axle):
- Dismount the steering knuckle swivel seals from the wheel hub assemblies (leave the seals hanging on the axle casing);
- Remove king pins from the front wheel hub assemblies.
- Remove the wheel hub assemblies from the axle;
- Remove the swivel seals from the axle casing;
- Note: You would to this only if you intend to reuse the parts from the wheel hub assembly, like the king pins, steering knuckle swivel seal, wheel bearing, etc.
- Note: It is not recommended to reuse any of those parts except possibly for the king pins and the swivel seals (if they are in very good condition). Better buy hem new.
- Disconnect both front shock absorbers from the front axle (leave them hanging on the vehicle);
- Disconnect the panhard rod from the front axle;
- Disconnect both anti roll bar links from the front axle;
- Disconnect both radius arms from the front axle;
- Disconnect both coil springs from the front axle;
- Finally, the front axle assembly should now be completely disconnected from the vehicle.
- Just lower it down and take it away.
- You will not need the front axle (+ front wheel hub) assembly any more, so you can donate it for example to a paramilitary group of your choice.
- They can use it on a makeshift trailer for towing light artillery.
Assembling the 4WD front axle
If you did not obtain the front 4WD axle assembly in a complete state, or if you want to refurbish some of its parts before its installation (example: king pin bearings), then some of these wiki articles might be helpful:
- Axle mount repairs
- CV joint replacement
- Front brake pad change
- Front wheel bearing replacement
- King pin bearing change
- Also, consider installing an extended breather tube on the front (and rear) differential casing, since you will be changing differential oil after the retrofit anyway.
- The wiki article "Transmission breathers" contains further details.
Anyway, even if you did receive the front axle assembly in the complete state and in perfect condition, you will still need to perform the following:
- Permanently block the vacuum pipe connections on the wheel hub assemblies (they are not needed and just allow ingress of contaminants);
- Remove the vacuum locking wheel hub heads.
- Then either convert them to fixed hub heads, or install manually operated free wheeling hub heads according to the wiki article "Manual or fixed front wheel hub heads".
- Concentrate primarily on part 1 (solutions 1a through 1d) in that article, as the other parts of that huge article are not that important for this case.
- Change the oil in the front differential after all work below is done.
Installing new 4WD transmission elements
- It is recommended to tighten every bolt to a factory specified torque value.
- Some of the bolt tightening torque values can be found in the "Torque" wiki article.
- It is also recommended to smear a bit of copper grease onto every bolt tread before tightening, in order to prevent its future seizure.
Transfer box
- First of all, consider installing an extended transmission breather to the 4WD transfer case while it is still dismounted.
- The wiki article "Transmission breathers" contains further details.
- In the cabin, cut out a hole in the floor carpet where the transmission lever is going to be.
- Now cut a suitable hole in the floor panel in the same place where you cut the carpet hole.
- The best way to determine the exact position of this hole is to measure its position in another "normal" 4WD Jimny which has the transmission lever.
- Rust-proof the cut-out in the floor panel.
- Mount the 4WD transfer box on the vehicle, with the transmission lever protruding in the cabin.
- Dress the rubber gaiter around the transmission lever.
- Connect the small propeller shaft from the gear box to the transfer box.
- Don't forget to properly align the propeller shaft to the transfer box according to the marks which you had made before.
- Connect the rear propeller shaft from the rear differential to the transfer box.
- Don't forget to properly align the propeller shaft to the transfer box according to the marks which you had made before.
- Fill the transfer box with suitable transmission oil.
- Try the transmission lever with the vehicle turned off and see if it moves correctly.
Front axle assembly
- Note: It is assumed that the "front 4WD axle assembly" is already complete.
- This means that the differential, half shafts, CV joints, and the front wheel hub assemblies are installed / connected to the axle casing.
- Manual or fixed front wheel hub heads are also assumed to be installed on the front wheel hub assemblies.
- Note: It is also assumed that the front brake components are already installed on the wheel hub assemblies.
- Bring the 4WD front axle assembly up to the front end of the vehicle and put it on two stands.
- Drain the old oil from the front differential (as you keep on working around, the last bits of oil will leak out).
- Connect both radius arms to the front axle;
- Connect both front shock absorbers to the front axle;
- Connect both coil springs to the front axle;
- Connect both anti roll bar links to the front axle;
- Connect the panhard rod to the front axle;
- Connect both tie rod ends to the front wheel hub assemblies;
- Connect the brake pipes to the front brake calipers;
- Optional: Change the brake fluid and bleed all brake lines;
- Mount the front wheels to the vehicle;
- Fill the front differential with new oil;
Front propeller shaft
- Install the front propeller shaft between the front differential and the transfer case.
- Don't forget to properly align the propeller shaft to the transfer box AND to the front differential, according to the marks which you had made before.
After assembly
Everything should now be assembled and ready for testing.
Testing the 4WD transmission
To be written ....
Final steps
- Lower the vehicle onto the ground.
- Turn the vehicle on.
- If you have manually operated front wheel hub heads, lock them.
- Switch the transfer box into 4WD-H or 4WD-L mode.
- Put the vehicle in gear.
- Drive away on a dusty road into the sunset.
Additional electrical fiddling
Indicator lamps in the instrument panel
- After performing all the conversion steps above, the 4WD system is now fully operational.
- The only missing function is that 4WD indicator lamps in the instrument panel will not turn on when the vehicle is in 4WD-H or 4WD-L mode, simply because there is no 4WD computer in the vehicle.
- However, the 4WD system will function just fine without the indicators - you just have to mentally remember in which transmission mode you are in.
- If you really want to have working 4WD indicators in the instrument panel (assuming that the instrument panel in 2WD-only Jimnys actually has them - not checked in practice), it can be accomplished.
- You need to connect some wires from the switch in the transfer box to the corresponding connectors in the instrument panel.
- The exact steps regarding which connectors to connect to which wires etc. should be written by someone else - currently you will have to refer to the corresponding Suzuki's wiring diagram.
- You need to connect some wires from the switch in the transfer box to the corresponding connectors in the instrument panel.
ABS control computer
- If your 2WD-only Jimny has ABS (most of them should not), you will also need to add wiring between the transfer box and the ABS control computer.
- The goal is to make a signal connection so that the transfer box constantly sends signal to the ABS computer in which transmission mode it is operating (2WD, 4WD or 4WD-H).
- Reason: The operation of ABS brakes differs significantly when the vehicle is in one of 4WD transmission modes compared to ordinary 2WD transmission mode.
- The exact steps regarding which connectors to connect to which wires etc. should be written by someone else - currently you will have to refer to the corresponding Suzuki's wiring diagram.
- Reason: The operation of ABS brakes differs significantly when the vehicle is in one of 4WD transmission modes compared to ordinary 2WD transmission mode.
Page last edited on 18/11/2020 by user Bosanek