Difference between revisions of "Axle mount repairs"
(Reprocessed the article to clearly indicate which content refers to Jimnys gen3 and which refers to Jimnys gen4) |
|||
| (15 intermediate revisions by 2 users not shown) | |||
| Line 1: | Line 1: | ||
| − | + | {{intro-notes}} | |
| − | |||
| − | == | + | == Introduction == |
| − | |||
| − | + | The axle mounts are a seriously weak point on a Jimny (on gen3 at least) - they are made of very thin metal and are prone to corrosion. | |
| − | < | + | |
| + | {{note|This guide has been written specifically for Jimny gen3. However, since Jimnys gen4 have the same general suspension design, all the main principles shown here are valid for them as well.}} | ||
| + | |||
| + | |||
| + | == Typical Damage == | ||
| + | |||
| + | |||
| + | They can wear out in an "oval" fashion that results in a strange "clunk" noise when letting the clutch up. | ||
| + | |||
| + | In the worst case the mount can corrode through and rip away from the axle, this is becoming increasingly common as Jimnys get older. | ||
| + | |||
| + | <gallery widths="400px" heights="300px" class="center"> | ||
| + | Good_mount.jpg|Good Axle Mount | ||
| + | Worn_mount.jpg|Worn Axle Mount | ||
| + | Broken_mount1.jpg|Broken Axle Mount | ||
| + | </gallery> | ||
| − | |||
| − | |||
| − | + | == Wear repair == | |
| − | |||
| − | |||
| − | |||
If the holes have worn oval then a welded repair can be carried out by creating some form of repair piece. You could weld strengthening over the hole or, as I do here, create a washer to fix the hole itself. The internet shows a simple steel washer welded over the hole or the creation of a "top hat washer" | If the holes have worn oval then a welded repair can be carried out by creating some form of repair piece. You could weld strengthening over the hole or, as I do here, create a washer to fix the hole itself. The internet shows a simple steel washer welded over the hole or the creation of a "top hat washer" | ||
I had to measure up to make the washers and the picture below shows the finished item and the template I sent to my friendly engineer to make them with. Yes, the template is simply a 2p coin and 2 x 5p coins – they were the correct dimensions for what I needed with a 12mm hole in the middle. | I had to measure up to make the washers and the picture below shows the finished item and the template I sent to my friendly engineer to make them with. Yes, the template is simply a 2p coin and 2 x 5p coins – they were the correct dimensions for what I needed with a 12mm hole in the middle. | ||
| − | [[image:Coin_template.jpg | | + | |
| + | The section on [[Radius arms and bush replacement|Removing the arm]] gives the details on disassembly of the arms themselves. | ||
| + | |||
| + | [[image:Coin_template.jpg|400px|thumb|left|Template and washers]] | ||
| + | |||
| + | * The trick is to now open out the oval hole in the mounting bracket to the point where the centre part of the washer fits the hole. | ||
| + | * I simply filed out the hole until the washers fitted. | ||
| + | * The first picture shows the washer as it should be fitted, whilst the second picture shows the same washer fitted backwards to show how it fits in the hole. | ||
| + | * I then filed out the other mount so that the other washer fits. | ||
| + | |||
| + | [[image:Washer_in_place.jpg|400px|thumb|left|Washer fitted in place]] | ||
| + | |||
<br clear=all> | <br clear=all> | ||
| − | + | ||
| − | + | [[image:Reverse_fitted_washer.jpg|400px|thumb|left|Washer reversed for clarity of fitting]] | |
| − | + | ||
| − | [[image: | + | * These arms are made with the adjustment built in. |
| + | * Therefore they should be fitted with STANDARD bushes. | ||
| + | * They are typically available for 3 inch or 4 inch lifts. | ||
| + | * Most people feel that 2 inch lifts do not need correction. | ||
| + | * If you are buying aftermarket arms, make sure they provide for vacuum piping, handbrake cables and ABS cables. | ||
| + | |||
| + | [[image:Welded_washer.jpg|400px|thumb|left|Washer welded in place]] | ||
<br clear=all> | <br clear=all> | ||
| − | + | ||
| − | + | ||
| − | + | == Replacement repair == | |
| − | + | ||
| + | |||
| + | This repairs a failed mount with a specialist part, the installation of which requires a high level of welding skills. I sent mine away to be repaired so all I have is pictures of the finished item. The brackets are made by a number of suppliers for welding on. | ||
| + | |||
| + | <gallery widths="512px" heights="384px" class="center" perrow="2"> | ||
| + | Axle-brackets-500x500.jpg|Replacement Axle Brackets | ||
| + | Brackets1.jpg|Axle Brackets | ||
| + | Brackets2.jpg|Axle Brackets | ||
| + | Brackets3.jpg|Axle Brackets | ||
| + | Brackets4.jpg|Axle Brackets | ||
| + | </gallery> | ||
<br clear=all> | <br clear=all> | ||
| − | |||
| − | + | == Torque Settings == | |
| − | |||
| − | |||
Full details of the torque settings can be found in the [[Torque#Axle | reference data]] | Full details of the torque settings can be found in the [[Torque#Axle | reference data]] | ||
<br clear=all> | <br clear=all> | ||
{{Edited}} | {{Edited}} | ||
| − | [[Category:Howto]][[Category:Steering]] | + | |
| + | [[Category:Howto - gen3]] | ||
| + | [[Category:Steering - gen3]] | ||
| + | |||
| + | [[Category:Howto - gen4]] | ||
| + | [[Category:Steering - gen4]] | ||
Latest revision as of 18:11, 24 February 2019
![]() The content of any article might be expanded / improved in the future - revisit it sometimes.
The content of any article might be expanded / improved in the future - revisit it sometimes.
![]() Seen a mistake? Know something that isn't written? Edit and change this article yourself!
Seen a mistake? Know something that isn't written? Edit and change this article yourself!
![]() Some images in the article (if present) can be enlarged by clicking on them.
Some images in the article (if present) can be enlarged by clicking on them.
Introduction
The axle mounts are a seriously weak point on a Jimny (on gen3 at least) - they are made of very thin metal and are prone to corrosion.
![]() This guide has been written specifically for Jimny gen3. However, since Jimnys gen4 have the same general suspension design, all the main principles shown here are valid for them as well.
This guide has been written specifically for Jimny gen3. However, since Jimnys gen4 have the same general suspension design, all the main principles shown here are valid for them as well.
Typical Damage
They can wear out in an "oval" fashion that results in a strange "clunk" noise when letting the clutch up.
In the worst case the mount can corrode through and rip away from the axle, this is becoming increasingly common as Jimnys get older.
Good Axle Mount

Worn Axle Mount

Broken Axle Mount


Wear repair
If the holes have worn oval then a welded repair can be carried out by creating some form of repair piece. You could weld strengthening over the hole or, as I do here, create a washer to fix the hole itself. The internet shows a simple steel washer welded over the hole or the creation of a "top hat washer" I had to measure up to make the washers and the picture below shows the finished item and the template I sent to my friendly engineer to make them with. Yes, the template is simply a 2p coin and 2 x 5p coins – they were the correct dimensions for what I needed with a 12mm hole in the middle.
The section on Removing the arm gives the details on disassembly of the arms themselves.

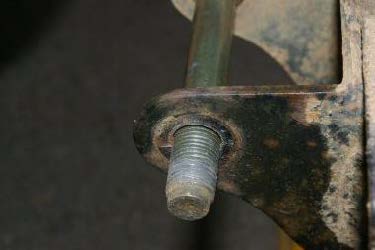
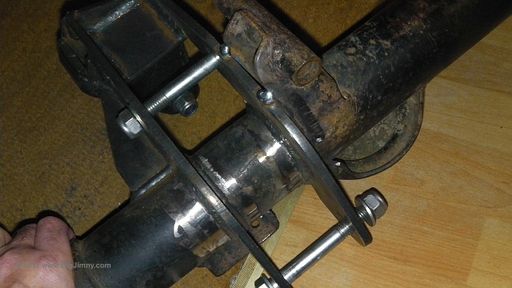
- The trick is to now open out the oval hole in the mounting bracket to the point where the centre part of the washer fits the hole.
- I simply filed out the hole until the washers fitted.
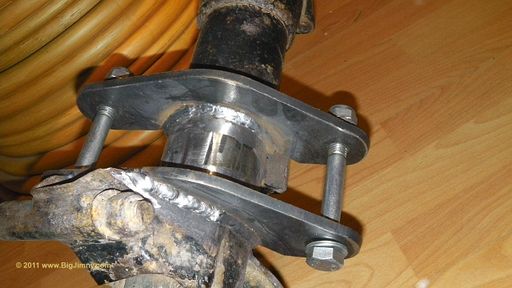
- The first picture shows the washer as it should be fitted, whilst the second picture shows the same washer fitted backwards to show how it fits in the hole.
- I then filed out the other mount so that the other washer fits.


- These arms are made with the adjustment built in.
- Therefore they should be fitted with STANDARD bushes.
- They are typically available for 3 inch or 4 inch lifts.
- Most people feel that 2 inch lifts do not need correction.
- If you are buying aftermarket arms, make sure they provide for vacuum piping, handbrake cables and ABS cables.

Replacement repair
This repairs a failed mount with a specialist part, the installation of which requires a high level of welding skills. I sent mine away to be repaired so all I have is pictures of the finished item. The brackets are made by a number of suppliers for welding on.
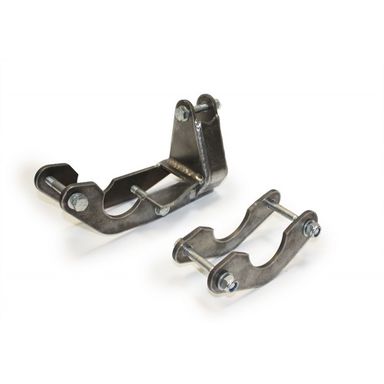
Replacement Axle Brackets
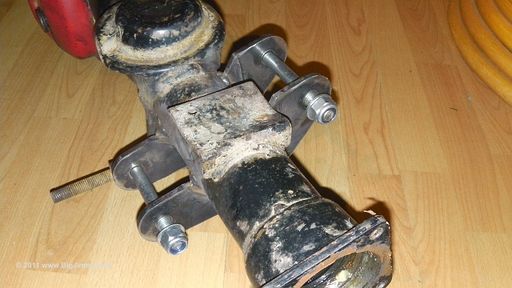
Axle Brackets
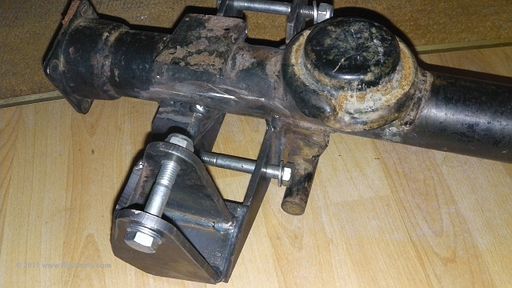
Axle Brackets
Axle Brackets
Axle Brackets


Torque Settings
Full details of the torque settings can be found in the reference data
Page last edited on 24/02/2019 by user Bosanek