Difference between revisions of "Rear cabin lamp installation"
(More pictures and info) |
m (Bosanek moved page Rear cabin lamp to Rear cabin lamp installation: Better name) |
Revision as of 08:59, 9 July 2019
![]() The content of any article might be expanded / improved in the future - revisit it sometimes.
The content of any article might be expanded / improved in the future - revisit it sometimes.
![]() Seen a mistake? Know something that isn't written? Edit and change this article yourself!
Seen a mistake? Know something that isn't written? Edit and change this article yourself!
![]() Some images in the article (if present) can be enlarged by clicking on them.
Some images in the article (if present) can be enlarged by clicking on them.
Contents
Introduction
- Jimny does hot have a factory fitted rear cabin lamp (neither in the trunk nor above rear seats).
- The topic of this article is to remedy that deficiency - to install some kind of lightning in the rear cabin area.
- The remedy can be achieved either through a factory designed solution (retrofit) or through various DIY solutions.
Factory designed solution
Description

- Most Jimnys have a factory-made hole in the body above the rear left window, which was meant for a rear cabin lamp.
- However, only some high-spec "Japanese domestic market" Jimnys have that lamp installed from the factory.
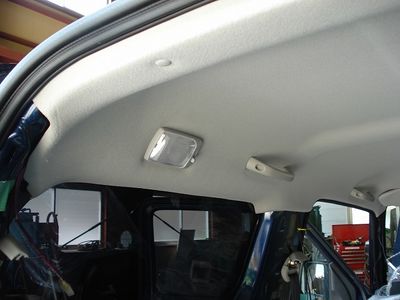
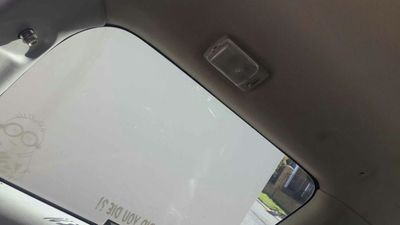
- On most other Jimnys, that hole is covered by the roof upholstery, with the position of the hole clearly stamped in it.
- The solution is to retrofit the required parts in this position and to wire everything properly.
- The goal is to have the rear cabin lamp which behaves identical to the front cabin lamp.
- Note: If your Jimny does not have the stamped recess in the roof upholstery as shown in the picture, it may not also have the prepared mounts in the roof behind it.
- You will need to investigate that before you cut out the upholstery!
Required OEM parts

- The OEM part number of the lamp is 36210-74F02-6GS.
- OEM lamp P.N. 36210-74F10-6GS should also be compatible (it looks the same as the above one).
- The OEM part number of the associated wiring kit (cable with suitable connectors on both ends and clips to hold the cable to the vehicle body) is 36820-81A10.
- Wiring kit P.N. 36820-81A00 might also be compatible (not verified).
- If your vehicle does not have a prepared unused wiring connector for the rear cabin lamp (see more in one of the chapters below), it might not make much sense to buy an OEM wiring kit (depending on its price).
- The OEM part number of a pair of needed screws (for mounting the lamp to vehicle's body) is 03141-0520A.
- These are standard screws, so it should be easy to obtain matching screws from any shop which sells various screws.
- At least you don't have to get screwed by the stealership by paying a ridiculous price for some standard screws!
- If your vehicle does not have an openness sensor / switch on the rear door opening (for the detection if the rear door is open or not), you will also need to obtain that OEM switch (P.N. 37670-79E00).
- Wiring this sensor / switch in parallel to the other two side door openness sensors / switches is required if you want all interior cabin lamps to illuminate together whenever you open any of the doors and the lamps' switches are in the "DOOR") position.
Additional notes about OEM parts

- The lamps P.N. 36210-74F02-6GS and 36210-74F10-6GS have only two switch positions written on their bodies ("ON" and "OFF"), and no "DOOR" position.
- However, it has been confirmed that the intermediate "DOOR" position actually exists in the lamps' switch, but is simply not written on lamps' bodies.
- Therefore, these lamp models can work in automatic mode to shine only when a door is open.

- Notice several clips attached along the cable.
- They are used to hold the wiring securely to the vehicle body, so that the cable does not bounce around and rattle when driving.
Obtaining the parts
- It should be possible to order the OEM lamp, wiring and screws from a Suzuki dealer.
- Just don't tell them that you need those parts for a Jimny.
- Telling so might confuse them, as these parts might be listed in their catalogues as fitting only Vitaras, Ignis etc.
- Just don't tell them that you need those parts for a Jimny.
- However, it appears that exactly the same lamp is a standard equipment in vehicle model Suzuki Vitara/Escudo Mk2 (a.k.a. "Grand Vitara") produced from 1998 to 2005, as well as in Suzuki Ignis (produced from 2000 to 2008).
- LWB (long wheel base) Vitaras have this lamp above the boot / trunk area, while it appears that SWB Vitaras do not feature it.
- There could be some other Suzuki vehicle models with the same lamp, who knows.
- So, look around for a dead Ignis or a LWB Vitara/Escudo Mk2 in vehicle junkyards.
![]() If you obtain this lamp from a dead Vitara or other Suzuki vehicle, try to also get the electrical connector (with some length of cables attached to it) which used to be connected to the lamp. Obtaining the entire wiring harness is even better.
If you obtain this lamp from a dead Vitara or other Suzuki vehicle, try to also get the electrical connector (with some length of cables attached to it) which used to be connected to the lamp. Obtaining the entire wiring harness is even better.
Installation procedure
Preparations
Required dismantling in order to gain access to install the lamp and the wiring:
- Remove the rear seats;
- Remove the bottom plastic trim of the rear door opening;
- Remove the bottom (floor) anchor of the rear left seat belt;
- Remove the bottom anchor of the front left seat belt;
- Remove the hard plastic rear lower left side trim (between the rear left side window and rear left wheel);
Mounting the lamp

- Once you obtain the needed parts, install the lamp in the pre-drilled factory position above Jimny's rear left side window.
- It should fit perfectly.
- The installation method shown here is by making a suitable cardboard template from the rear of the new lamp and then cutting the upholstery accordingly with a sharp blade.
- There are suitably factory pre-cut holes for lamp's body and two holes for screws in vehicle's body just behind this recess in the roof upholstery.
- Therefore, no drilling or cutting of any metal is required.
Wiring the lamp
- Beware that you will have to install some wiring as well, because Suzuki did not install any wiring in that rear cabin lamp position above the rear left side window.
- If you are lucky, your vehicle will have a prepared 3-wire el. connector in the body cavity between the rear left side window and the rear left wheel.
- There is no hard rule on the basis of which you can determine if your vehicle has that connector or not.
- For example, the presence of stamped-in upholstery for the rear cabin lamp above the rear left side window does not guarantee the presence of this el. connector.
- There have been many reports of Jimnys which have the first, but lack the latter.
- The currently only certain way to know if your vehicle has a factory prepared wiring is to dismantle the rear interior and to see the wiring for yourself!
- For example, the presence of stamped-in upholstery for the rear cabin lamp above the rear left side window does not guarantee the presence of this el. connector.
- There is no hard rule on the basis of which you can determine if your vehicle has that connector or not.
- If your vehicle does not have factory prepared wiring for the rear cabin lamp, you will have to fiddle with custom wiring (see more below).
- In this case, it might be pointless to buy original Suzuki wiring for the rear cabin lamp, as you will have to butcher and extend one of its ends anyway.
- The only benefit of getting the OEM wiring in this case is to have proper connection between the cable and the lamp itself.
- In this case, it might be pointless to buy original Suzuki wiring for the rear cabin lamp, as you will have to butcher and extend one of its ends anyway.
If the vehicle has prepared wiring

- Look for an unused 3-wire connector which is located in the green-rounded or the red-rounded area in the picture.
- If you find it, just connect the rear cabin lamp to it (preferably using the OEM wiring kit) and bring more light into your life.
- There might also be a 4-wire connector in the same area (usually with two green wires and two grey wires).
- That one is meant for the rear speakers - DO NOT use it for the rear cabin lamp!
If the vehicle has no prepared wiring
In this unfortunate case, you will need to do the following:
- Connect one wire from the rear cabin lamp to the rear door openness sensor / switch or to the left side door openness sensor / switch;
- Connect the 2nd wire from the rear cabin lamp to earth (vehicle body);
- Alternatively, you can also connect it to the earth wire which goes to the front cabin lamp.
- Read the next step for more info on this solution;
- Alternatively, you can also connect it to the earth wire which goes to the front cabin lamp.
- Connect the 3rd wire from the rear cabin lamp to the power wire for the front cabin lamp.
- This one is easier said than done, as this wire is located far away - in one of the front foot wells (behind / below the dash board).
- You will have to install the 3rd wire throughout the cabin, all the way from the rear cabin lamp to near the bottom anchor of the front left seat belt, and then further on somewhere under the trim below a side door, and then finally splice it into the wiring loom in the front foot well.
![]() If someone has a better guide on how to wire this 3rd wire, please improve this section.
If someone has a better guide on how to wire this 3rd wire, please improve this section.

- According to one forum report, here is the wire to which you need to connect the 3rd wire from the rear cabin lamp.
- It is a white wire (red-circled in the picture) in the connector which is located behind the left part of the dash board.
- That should be above the gas / brake pedals in LHD Jimnys, and behind the passenger storage compartment in RHD Jimnys.
- Note that the wiring for the front cabin lamp differs in different Jimnys 3 (probably depending on year on construction), so that this specific illustration is valid only for certain Jimnys (probably built from 1998 to 2005).
Finished result
- Examples of installed and working OEM rear cabin lamp
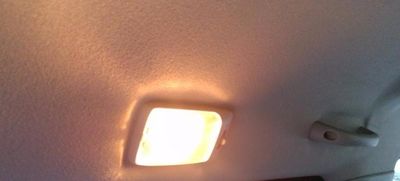


- This is the dream which you are aiming to make a reality.
- When lamp's switch is set to OFF, it is always OFF.
- When lamp's switch is set to ON, it is always ON.
- When lamp's switch is set to DOOR (unmarked intermediate switch position), it will be shining whenever any of the doors is open.
Additional info
The following forum discussions contain pictures, details and installation guides for the retrofit of the OEM rear cabin lamp:
- A South African forum discussion;
- A discussion on this forum;
- A German forum discussion 1;
- A German forum discussion 2;
- A Japanese installation guide;
DIY solutions
Write about any DIY rear cabin or trunk lightning solutions here ...
Page last edited on 9/07/2019 by user Bosanek